


03 Feb How to Export Orders from WooCommerce
WooCommerce is one of the best and most famous add-ons for WordPress CMS. The fact that it is used by almost 30 percent of all online stores globally says a lot about its popularity.
To improve the functionality of the WooCommerce plugin, numerous extensions provide new features and options. In today’s article, we will mention extensions used for exporting WooCommerce data.
How to Export WooCommerce Data
There are so many plugins you can use to export WooCommerce data. One of the best tools currently available is WooCommerce Order Export by JEM Plugins.
WooCommerce Order Export is a great plugin that quickly exports WooCommerce data in CSV or Excel format. Using this plugin, you will export all the data you need in just a few clicks. It is very clear, easy to use, and can be used on Windows and MAC platforms.
The most significant benefits of WooCommerce Order Export are ease of installation and setup. You can install the plugin in just a few seconds. The simple user interface makes it easy for beginners and established users. Within the plugin, many filters will help you determine exactly which orders you want to export. You can then export WooCommerce data with just one click.
It is important to emphasize that the WooCommerce Order Export plugin has a free and a PRO version. The PRO version comes with advanced features, and you have additional options such as additional fields for orders, the ability to export customer data, the ability to export shipping data, if you have coupons in your online store, then you can export coupon data, if you have many categories then you can export category data, export tags, schedule your exports and send scheduled exports directly to email or an FTP account.
While the WooCommerce Order Export plugin has a lot of options that make business easier, there are some of the options that you will surely use most often.
Features
 Date Ranges
You can choose to export data that binds only to a specific date range. You will do this by clicking on the “FROM DATE” field within the “Select Range” option and selecting the start date. There is an integrated calendar to help you choose a date. Then click the “TO DATE” field to select the end date. Once you have set the start and end dates, simply click Export.
Your data will be ready and exported in just a few seconds. If you do not want to select a date manually, there is an option to select a predefined date range. Within the same screen, click on “Predefined Range.” You will be able to select already predefined values such as “today’s orders,” “yesterdays orders,” “this week’s orders,” “last week’s orders,” “month to date orders,” “last month orders,” and “year to date orders.” After selecting the desired options, click on “Export,” and the job is done.
Export New Orders Only
For some reason, you may want to export only new orders. With this plugin, it is also possible. There is an option “Export new orders only on the main export screen.” Next to this option is the PLUS sign. Click on the plus to see additional options. There aren’t many additional options; there are only two.
The first option is a checkbox that says “Only export new orders.” This option is used to turn this functionality on or off. Another option is “Starting after order #.” This option determines where the data export starts. Enter the value you want, and this will be the initial value. All orders that occurred after that value will be exported.
Filters
 There are three types of filters based on which you can filter what data you want to export from your WooCommerce store. These filters are “Order filter,” “Product filter,” and “Coupon filter.”
Order filter is the default filter that you use to export data. Inside, you have “Order status” which offers several options namely “pending payment”, “failed”, “processing”, “completed”, “on hold”, “canceled” and “refunded.” If you want to export all the data, leave these options unchecked.
Within “Order Fields,” select the desired filter, enter the value you want and click Add. Your job is done. Product fitter offers filtering based on two options, namely “filter by-product” and “filter by product category.” In the “filter by product” option, enter the product you want to export.
After entering the product name, that product will appear on the screen. Within the “filter by product category option,” you can select the entire product category. Enter the name of the category, and it will appear on the screen, and then you will export all the products stored in that category.
The coupon filter allows you to export data only to those orders used by the coupon. This filter offers two options, namely “Any Coupon” – includes the export of all orders on which a coupon was used, “Specific coupon” – includes the export of data on which only a specific coupon was used.
Fields to Export
This is a very good option where you can select only specific fields you want to export. When you open this option on the right side of the screen, fields will be grouped within a particular group. Select the field you want and drag-and-drop the field to the left of the screen where the fields to export are located.
All fields on the left side of the screen will be exported. It is important to emphasize that the fields ready for export can be updated and rescheduled by dragging them up or down. If you have changed your mind and do not want to export a field, click on the delete button, and that field will be excluded from export.
Export Preview
WooCommerce Order Export has one great option that will save you a lot of time, and that is “export preview.” At the bottom of the export, the screen is the “Preview” option, where you can preview the export.
The first 25 fields previously predefined for export will appear. This way, you can check that you have chosen correctly which data you want to export.
Dashboard
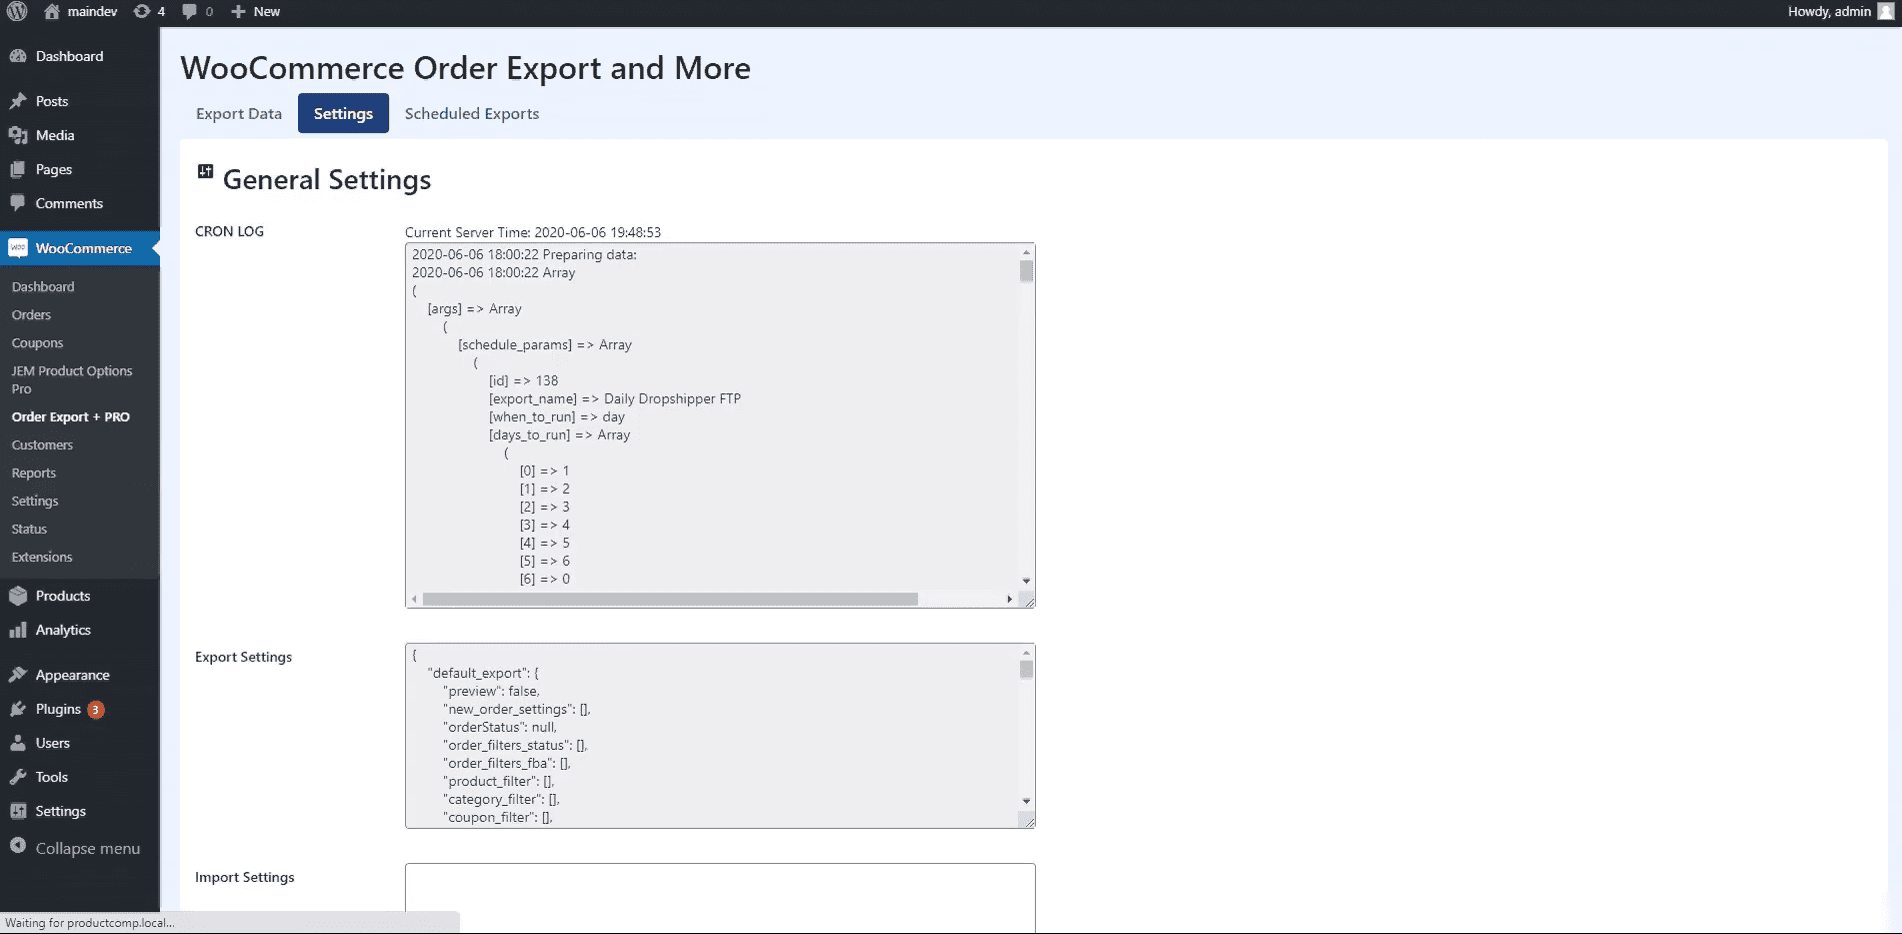 Like any other plugin, you can configure WooCommerce Order Export in a few different ways. The basic settings are located on the “Settings” tab. Within the “General settings” tab, you can see all scheduled exports and tune how data is imported from one site to another.
This option is divided into three parts, namely “cron log,” “export settings,” and “import settings.” The “Cron log” displays the date and time on the server and records the export log so you can do the additional analysis later.
“Export settings” contain all settings of all your order exports. You can very easily insert these settings into another site by copying the contents of this section to the “Import settings” section and clicking on the “Import” button.
Scheduled Exports
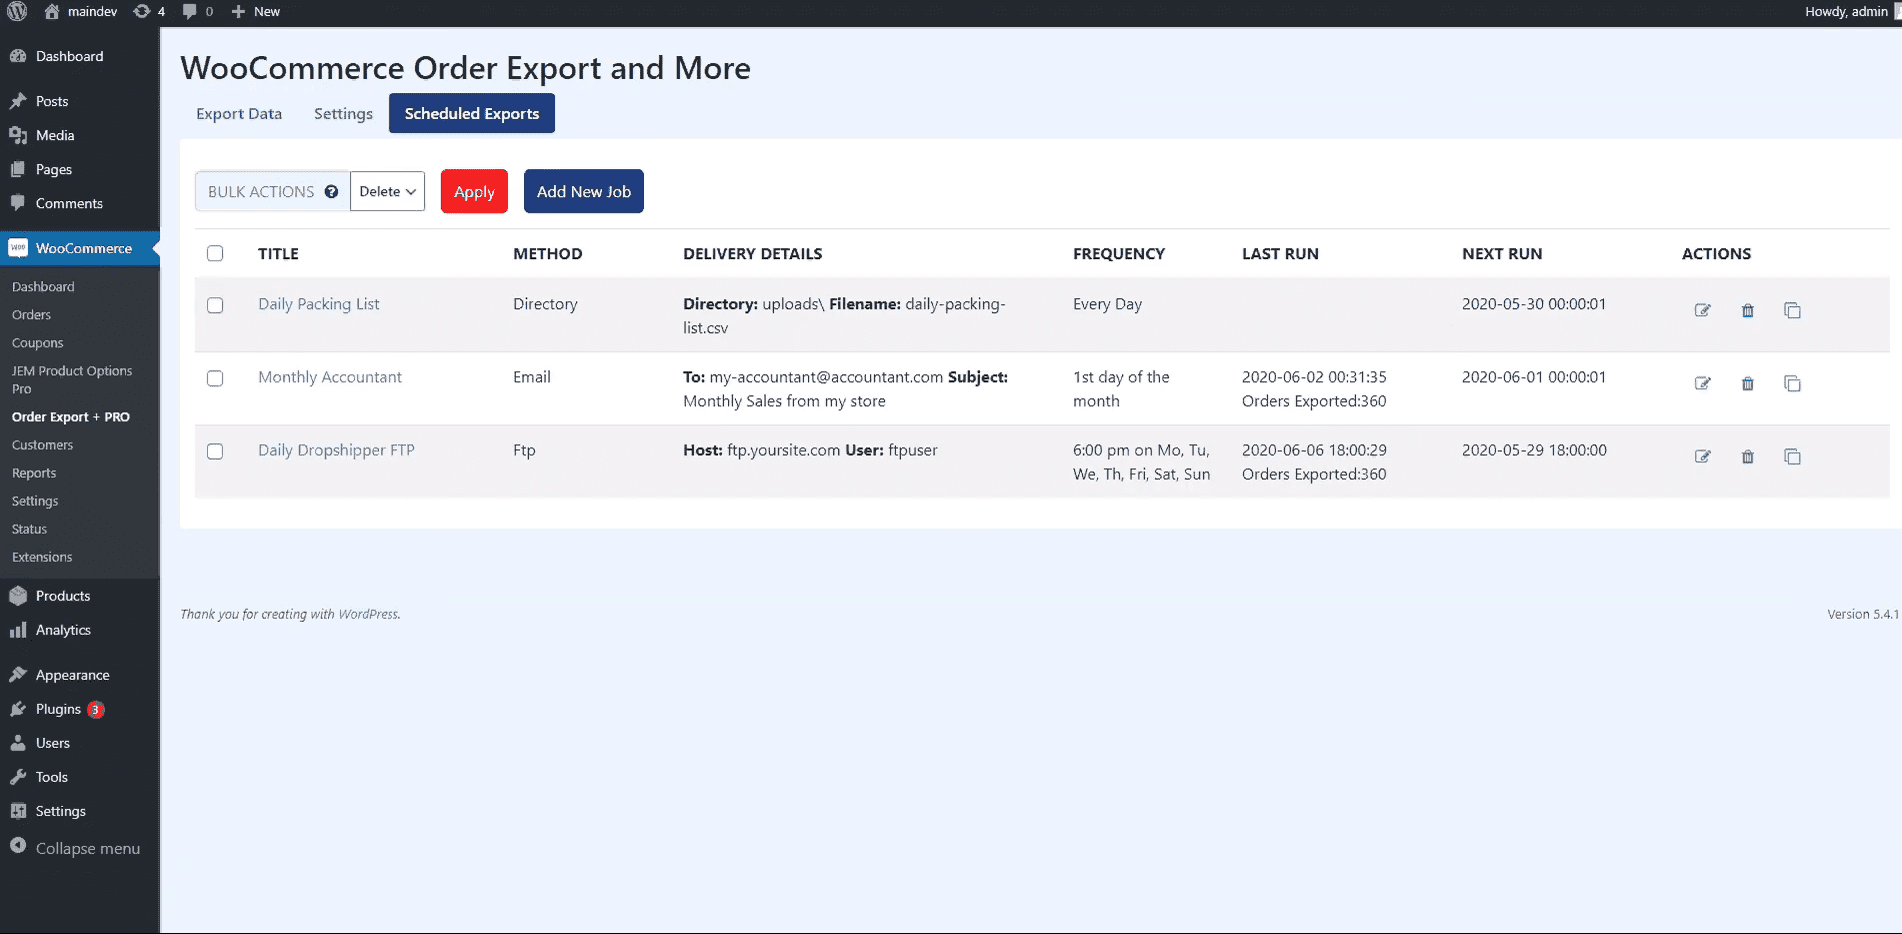 You can schedule all tasks related to data export. Select the date and time within the “Scheduled Exports” option, and the export job will execute itself. You can set all export details to be sent to an email or some FTP account, and that will allow you to have an insight into all the jobs that have been done.
Scheduling an export is done by clicking on “Add New Job” on the “Scheduled Exports” tab. After that, a screen will appear in which you need to select several options. The first option is to enter the Export name for the new export. Then you need to define when to run the export.
There are three options to choose from: “specific day” – select the day and time when the export will start, “Predefined schedule” – select an already predefined value. It is possible to select “daily,” “1st day of the month”, “last day of the month,” and “Every hour.”
Within the “Delivery details” option, select how you want to save the data or export. You can submit them by email to your FTP account and Directory. Then click on “Save export,” and your job is done.
Conclusion
Although there are many tools for exporting data from WooCommerce stores, our favorite is WooCommerce Order Export. Simple interface, speed of execution of tasks, reliability, and price are the reasons why every serious WordPress administrator should include this plugin in their collection.
No Comments