30 Jun How to Setup and Enable WordPress Multisite Correctly?
Assuming that you are already introduced to WordPress Multisite feature, so I am directly sharing the process here. Yes, the much-awaited process that will help you enable WordPress multisite correctly.
This feature is really helpful but only in a condition when you have a lot of WordPress driven websites to manage. If they are only one or two, then this feature isn’t for you. On the other hand, if you have to login in a good number of WordPress sites, manage them, update plugins, setup themes, etc., then this comes pretty handily.
In fact, I can bet that after using this WordPress multisite feature to manage a bunch of blogs, you are definitely going to recommend it with all your fellow bloggers or WordPress developers.
Table of Contents
How to Enable WordPress Multisite?
For starters, this feature works on the server hosted websites and also on the one which is hosted on a local drive. Also, try this whole process on a testing website rather than the one which are live. Even after successfully trying with this process and proceeding with a live website, I recommend you to take a complete backup of existing website status.
1. Edit your wp-config.php file
The first step is to add a specific code in the WP Config file (wp-config.php). Insert the code just below /* That’s all, stop editing! Happy blogging. */
/* Multisite */
define( 'WP_ALLOW_MULTISITE', true );
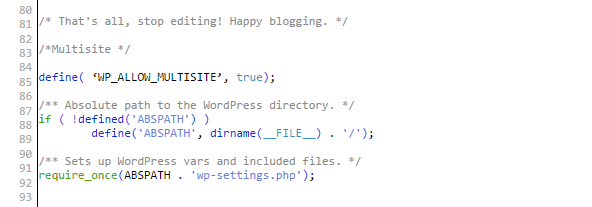
After adding this code, save the file and login into the Dashboard of existing website.
2. Login and Deactivate all Plugins
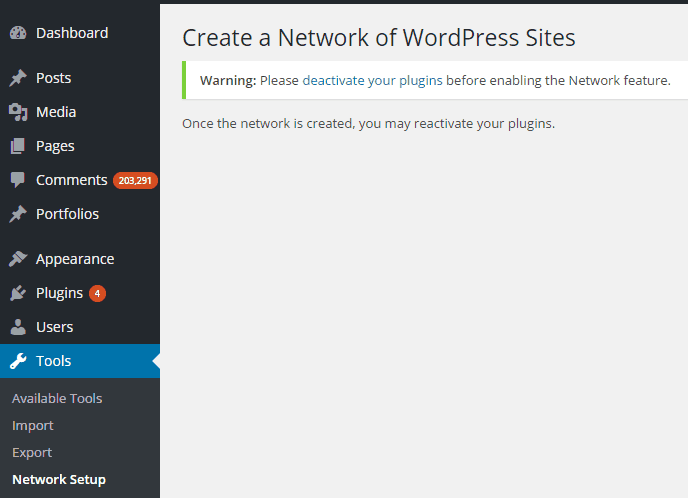
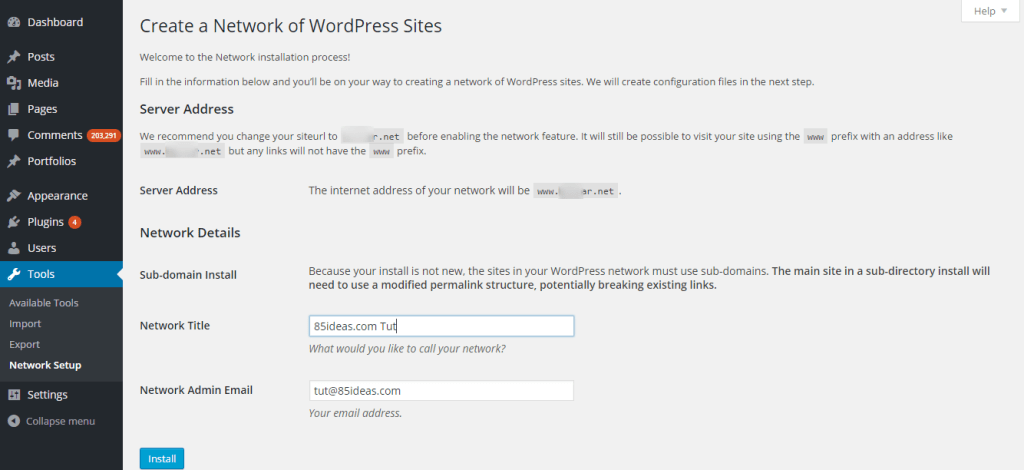
Inside the Dashboard area, click on Network Setup option that is newly added under the Tools section. If you didn’t find it, then try adding that code somewhere else in that file and try again. Also, before beginning with the network setup process now, it is recommended to Deactivate all the Plugins that are installed.
3. Choose sub-domains or sub-directories for your Multisite
Once you are done with that plugin gig, you can proceed to the installation page and enter Network title and admin email ID.
As you can assume the next, click on Install button to proceed.
Note – If this WordPress website is freshly installed (within a month) then you will be asked to choose between two options. These options will set up the multisite feature either on a sub-domain or a sub-directory. You can choose any of your choices, depending on the way you love to create and manage sub-websites.
4. Add the Generated code to wp-config.php and .htaccess files.
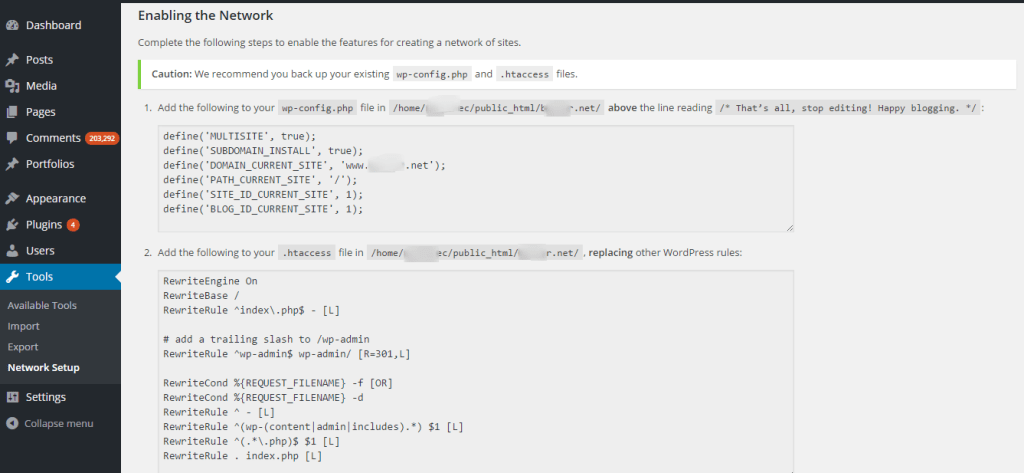
Now, once that installation process is over, you will have two different codes, which are needed to be added in wp-config.php file and .htaccess file. Every necessary instruction to help you successfully add the codes in these two files is written right there.
Note – Avoid copy-pasting this code from any other source over the web. That’s because, the code offered after the installation at your end, is custom with respect to the options you selected during the installation.
In case of the wp-config.php file, you can add this code at a location where the previous code was posted, where it worked successfully. And, in case of .htaccess file, paste the code between the ‘# BEGIN WordPress’ and ‘# END WordPress’ tags.
Once getting done with this code pasting gig, save both the files and reload the Dashboard area of the current website.
5. Log out and Sign Back in

The session you were logged in earlier will get expired and you will be asked to login again. Proceed with the login process and once you successfully land inside, you will find yourself at the very new Network Dashboard.
[easy-tweet tweet=”I just Setup my Multisite Installation in 5 easy steps, Thanks 85ideas ” via=”no” hashtags=”#WordPress”]
Part 2 – The Management
I hope you remember the selection you made between sub-directory and sub-domain. If it was sub-domain, then the main WordPress installation should be present in the Root folder not in sub-directory while. While, in the case of sub-directory, it should be in a sub-directory. Of course, WordPress allows changing this setting in future, but you need to be extra careful while planning and doing it.
I am assuming that you have already setup sub-domains or sub-directories to run different websites. They are going to be part of the main websites like a Forum, Support Website, or a truly separate one. If not, then do it now! It can be done using Domain tool available at your server’s cPanel.
At the Network Dashboard, you will clearly see the number of websites hosted on this single network and the number of user profiles they individually have.
You also have options to add new sites and users. Of course, the process now is simpler than this current one.
At the top admin bar, you will see an option to select the website from your network and then you can switch to its individual Dashboard.
While sticking to the Network Dashboard, you can click on Plugins, Themes and Users options from the left sidebar and manage them, as per your requirements.
This special Dashboard also has a Sites option, which holds a list of every website and certain related details. You can set Super Admin for all the sites, Admins for individual sites and other users, right from this section.
Once you are creating a new user profile or editing an existing one, you are offered certain checkboxes. This is to allow you to offer certain privileges to that user account while keeping some of them turned OFF. This is how you can either allow a user to delete any plugin or stop doing that.
This is just an example of the privilege you can offer or stop. At the real scene, you will find a huge list covering every possible scenario.
Before wrapping up the process, yes its over, I want to hear your side of experience with this WordPress Multisite feature. I didn’t cover each and every feature of this WordPress website network manager tool because not a single feature is completely new.
Since, you have managed a WordPress driven site so far, you can easily do the same at this Multisite Network Dashboard as well. The only thing changed is that now you have a lot of options right under a single Dashboard, which shouldn’t be a surprise.


No Comments