

05 Apr SSL and WordPress: Implementation and Best Practices
Today, let’s talk about the security. SSL is one way to implement a security layer on a website which will protect the data flow from theft and malware. Using an SSL is not necessary in every case as it’s mostly used wherever sensitive data is in the role.
WordPress being an open-source platform holds tons of vulnerabilities which are regularly fixed with the core team and other third-party developers. This is the prime reason why using a genuine and top-class hosting provider is always recommended.
However, things can still go rogue and one way of keeping that from happening is by using SSL or implementing HTTPS module throughout the website.
Let’s read out the details related to SSL and WordPress and then learn how to make it happen.
Table of Contents
What exactly is SSL?
SSL is the abbreviation for Secure Sockets Layer and it basically creates a secure tunnel for the data to transfer without getting leaked or hacked by any unknown or unwanted source.
Its responsibility is not limited to creating a secure tunnel but extends further to encrypt the data before transmitting and later decrypt the same when received. A secured key is used for encryption and decryption.
Now, anyone having the right access and this secured key for encryption and decryption will be able to access the data. If anyone else gets access to the data, somehow, then a rubbish data will be delivered, which will be of no use because of the encryption.
In more technical terms, SSL is a name given to the secured HTTP protocol which is also termed as HTTPS. The ’s’ in the name stands for the security.
HTTP is a protocol which acts like a tunnel for data transfer from one server to another. Ideally, HTTP channel is not secured as everyone on the server can have the proper access to the available data. It’s not like the data is available for everyone, but it’s not protected from thefts or any malicious attempt.
Since there is no protection involved, anyone with the right knowledge can hack the data and use it for any purpose. So, to keep a protection layer on sensitive data, HTTPS is used.
In all known browsers, whenever a secured tunnel is used, the web address (URL) in the address bar starts with a green lock icon and green colored ‘https’ protocol. It helps in quickly identifying if the channel is protected or not.
Where to use SSL?
Once you’ve bought an SSL certificate (more on this later), then there you can either use it for the whole website or for specific sections or URLs. For niches like e-commerce, banking, etc., it’s mandatory to use SSL everywhere but the same isn’t that necessary for any normal website.
Recently, a lot of bloggers and internet marketers started using SSL on their blogs and micro-niche sites. This was due to the fact that Google started using security as a ranking signal among its SEO algorithms. So far, I’ve seen very few sites getting a noticeable SEO benefit after implementing SSL. Thus, it’s not that necessary to jump onboard.
The theory which makes sense (to me) is that the login area where sensitive data like user profile and password are involved should be protected with HTTPS, while keeping rest of the pages on the normal protocol.
Like in the case of a WordPress installation, the complete Dashboard area beginning from the login page should be kept with SSL protection, while keeping every other part without any protection. If a person is interested in hacking the site, he/she needs to go into the Dashboard area or try it on the server level, which is usually protected (if not, you shouldn’t be working with them).
Now you know where exactly to use SSL on a WordPress installation. Let’s move onto our next section on how to setup SSL on a WordPress site.
How to Setup SSL on WordPress site
There are two ways to implement SSL on a WordPress site. The first one is, of course, the manual implementation and as we’re talking about WordPress, so the other method is the plugin implementation.
We will look into the both methods so that you can pick the favorite one.
#1 Manual setup (New Installation)
There are two ways to implement SSL on a WordPress site. The first one is, of course, the manual implementation and as we’re talking about WordPress, so the other method is the plugin implementation. Before installation, you should understand the domains needed to be secured. You can search for SSL certificates as there are reputed certificate authorities and resellers like Sectigo, GlobalSign, GeoTrust, SSL2BUY, RapidSSL, etc from where you can purchase required SSL certificates.
This method should be used in case of a new website setup and also while implying the feature throughout.
Step 1 – Ask the hosting provider to install the SSL certificate on the server.
Step 2 – Once step 1 is done, login to the Dashboard and go to General configuration page under Settings.
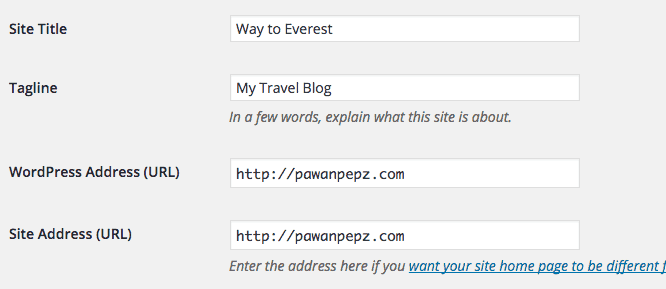 Step 3 – Now at WordPress Address and Site Address, update the URL with the new ‘https’ protocol. Click on Save Changes button.
Now the WordPress will take care of the redirection on its own and since this configuration is made, users will always have access to the https version of the website. In other words, there will be no HTTP version in existence.
#2 Manual setup, Case 1
This method should be used in case of an existing setup, as if you force users to use the https version, the HTTP version will still be in existing. So, a proper redirection should be active in the background to take care of such requests.
Step 1 – Ask the hosting provider to install the SSL certificate on your website’s installation.
Step 2 – Once the SSL is active, add the following code in .htaccess file (while replacing ‘yoursite’ part):
<IfModule mod_rewrite.c>
RewriteEngine On
RewriteCond %{SERVER_PORT} 80
RewriteRule ^(.*)$ https://www.yoursite.com/$1 [R,L]
</IfModule>
Step 3 – Save the file and now edit the ‘wp-config.php’ file and paste following code before the existing code end.
define(‘FORCE_SSL_ADMIN’, true);
Step 4 – Save the file. Now, both the website and the Dashboard areas will be working on SSL mode.
#3 Manual Setup, Case 2
This is the third method, again a manual setup but with a different case, i.e., if you wish to implement SSL on specific URLs, not on the complete website.
Step 1 – The SSL certificate should be installed by hosting provider on your website’s installation.
Step 2 – After then, login to Dashboard area and install this WordPress HTTPS (SSL) named plugin.
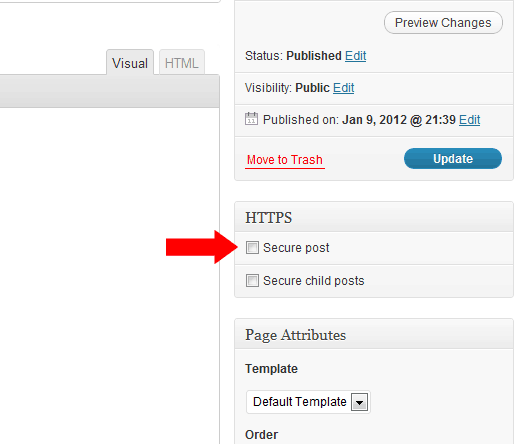
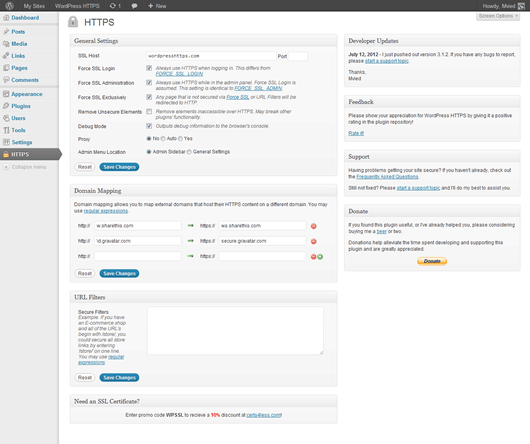 Step 3 – Once it’s installed, it will give you a proper configuration tool using which you can set which section or URLs to work in SSL mode. These settings are also available with individual Posts/Pages.
 While this plugin is still offering its services and is compatible with the WordPress 5.0 version, it’s not been updated in last three years. So, you should be testing it out thoroughly before making it active on a live website. For now, I couldn’t find any alternative which can offer similar features.
Best SSL Plugins to Setup HTTPS on WordPress
The plugin I just mentioned is not the only one out there, as we also have few other names to consider. Although, they don’t offer the same functionality.
#1 Really Simple SSL
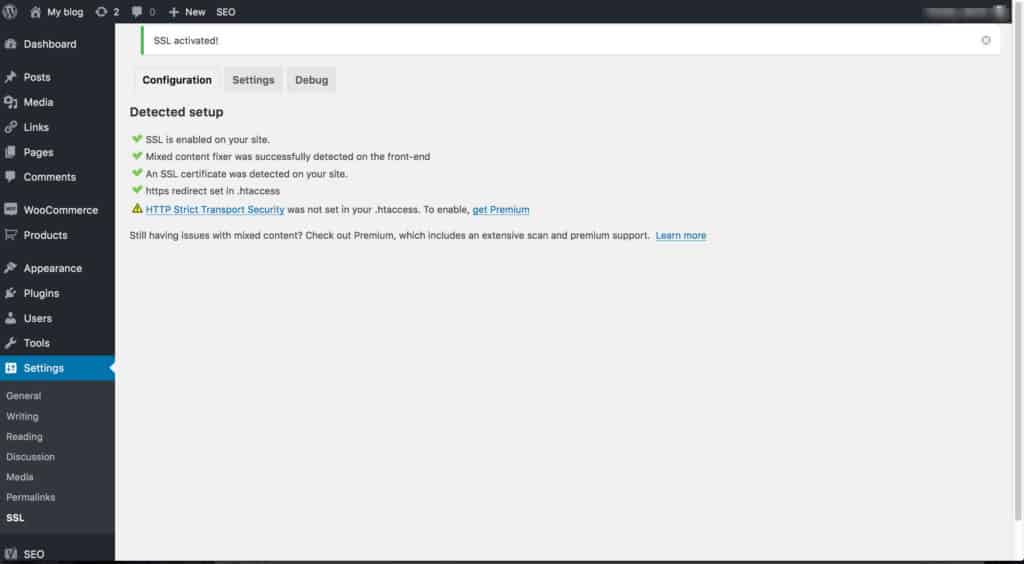 It’s free of cost available product which can implement SSL throughout the website with a single click. It does few more things like fixing the insecure content issue by doing the required replacements at the URLs. The product is minimal and doesn’t offer any useless or additional features to configure or burden the website with. However, there is a Pro version of the same plugin, which does bring additional features to the table. One worthy feature the paid version brings is that it implements HTTP Strict Transport Security to the website, improving the security part to the next level. The plugin becomes powerful to perform extensive searches and scan for any malicious content or similar issues.
#2 SSL Insecure Content Fixer
 As the name suggests, this free plugin is capable of fixing the insecure content issues which are usually the case after implementing SSL mode into any WordPress website. The plugin can clean up the mess and it functions on automation. If in the case of Multisite installation, a separate configuration page is available using which default settings can be set for the whole network.
#3 Easy HTTPS Redirection
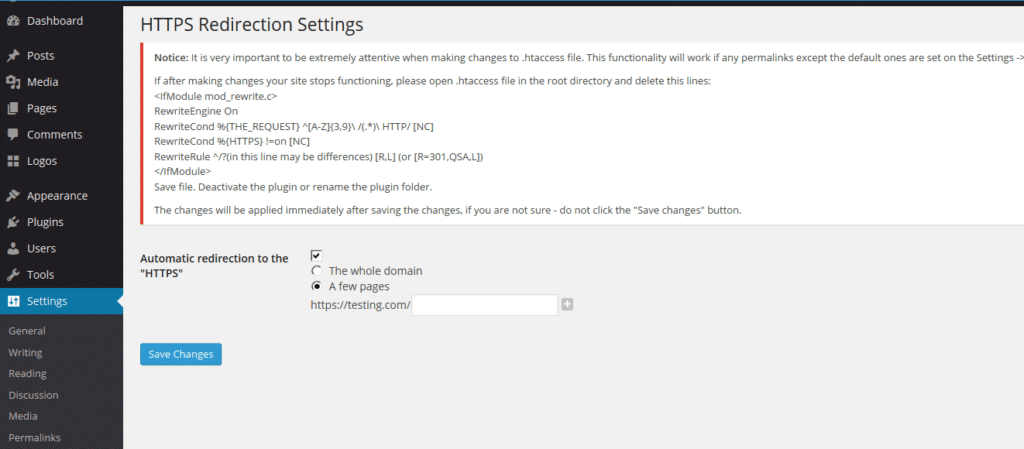 The third recommendation is again a free plugin which after installation, handles the redirection part pretty well and make sure no silly issues occur. It can redirect the URLs from HTTP to HTTPS versions and that too on automation. Moreover, it can force the static files like images, js, CSS, and other similar content to load using an HTTPS URL. A custom configuration can also be achieved by specifying the pages to stay out of this plugin’s reach. It does come with a dedicated support forum.
#4 WP Force SSL
 This is the final recommendation from my side which does a simple job, i.e., adds a redirection to every URL of a website and forces it to open in HTTPS mode instead of the non-secure HTTP mode. This plugin requires you to go through the first Manual Setup case I’ve mentioned earlier. There is no pricing involved but it’s not been updated over a year. So, do check the compatibility before moving ahead.
Implementation and Best Practices
#1 SSL adds a security level which will definitely increase the user experience, and since it’s being counted as a ranking signal, it can help your website get on better ranks than usual ones. However, the benefits might not apply in every case.
#2 Technically, HTTPS is slower than HTTP, as encryption and decryption processes are involved. With the advancement of technology, the gap is being lower down, but HTTP will still be a winner. Considering the fact that Google uses the speed of a website as a major ranking signal, you need to re-consider your move here.
#3 If you’re a developer and like learning technical things, then you should learn how to manually install an SSL certificate on the server. Otherwise, look for a hosting provider which takes care of this requirement on its own. Many providers like SiteGround offer free SSL certificates which are one-click away from installing.
#4 While setting up a new website, HTTPS can be implemented on the whole website but in the case of an existing one, you need to think twice about which URLs or sections to cover, if not planning to cover the whole website. The implementation should be done correctly otherwise visitors will start getting silly security related issues while visiting the website.
Conclusion
This was all about SSL and WordPress, how they are related and the best practices to follow. Let me know if you have any doubt in the discussion section, and I’ll come up with a working solution.
*last updated 11/24/2020
No Comments