

16 Feb Start a WordPress Blog the Right Way – Step by Step Tutorial
You want to start a WordPress blog in just 5 minutes? Check out this article, as today we will present an easily understandable step by step tutorial in how to start a WP blog the right way.
All you need to start your own WP blog is a domain name and a hosting platform. Once you purchase a domain name and choose a hosting platform and a hosting plan which suits your needs, just install WordPress and start blogging right away.
- Step One – Choose a blog name
The first step in starting a WP blog the right way is choosing a perfect blog name. Depending on what your blog will be about, choose a name, and check the availability on some of the many domain sites
A good domain name should be descriptive, so your readers may instantly tell what your blog in about just from the name.
- Step Two – Get your blog online
Once you choose your domain name and purchase it, it is time to get your blog online. This step might sound too technical and difficult, but the steps below will make the process as easy as it can be and walk you through.
- To get your blog online and running, you’ll need two essential things: Blogging software and blog hosting, and the good news is that these two things usually come packed together.
Today, we will show you how to start a blog using the WordPress blogging software, as it is known to be one of the most used and popular software among users worldwide, easiest to use and most customizable.
As for the blog host, today we will take as an example BlueHost, as personally I think that this is one of the best hosting companies out these. BlueHost will register your domain name for free while making sure no one else can take it. Besides that, they offer a simple and totally free installation of the WP blogging software.
BlueHost currently hosts over 2 million websites and blogs, and has been recommended by WP since 2005. They have a very helpful 24/7 customer service via web chat or email, and they have a money back guarantee is you are not satisfied for any reason.
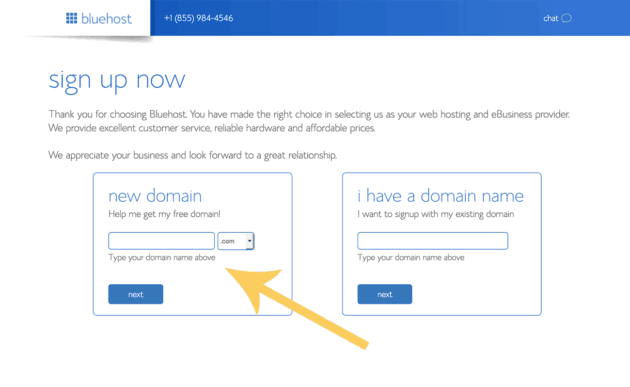
Open BlueHost, click get started now and select your plan. On the next page you should enter in the previously chosen domain name. Note that you may add unlimited blogs and websites to your BlueHost account, so you don’t need to worry if for any reason you don’t really feel your current domain name. The following step is very easy. All you need to do is enter your contact details and payment information.
- Install WordPress for free from your new cPanel within BlueHost
Now that you have purchased your domain name and hosting package, you will gain access to a cPanel within your BlueHost account. CPanel is actually the engine of your hosting, and comes packed with dozens of different icons which link to various features and services that are available within your hosting account.
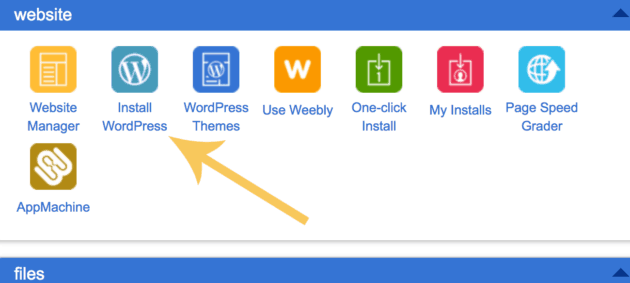
The next thing you need to do is scroll down until you see an icon called “Install WordPress”. This awesome new software will allow you to install WP on your host in just a few clicks. Afterwards, fill all the given options, and make sure you use a complex username, not admin, and a password.
And you are all set!
Once you finish with the installation, it will give you a confirmation screening showing you a unique WP login URL, which will look like this:
https://www.eurodns.com/
- Choose a perfect theme for your website and start blogging
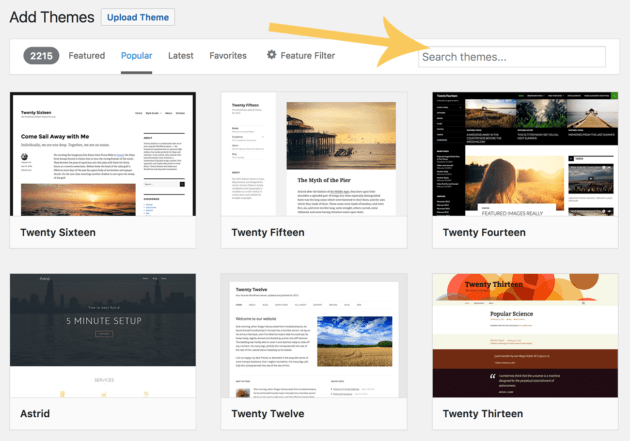
The final step is where you choose and install a gorgeous theme and start blogging. To change your theme, simply login to your WP dashboard using the URL mentioned above, and click on Appearance > Themes > Add New, and find a theme using the Search box. There are thousands of gorgeous themes that you may choose from.
Once you find a theme that suits your needs, just click install, and you are all set. If you run into any trouble whatsoever, just contact the BlueHost amazing 24/7 live support for help.
- Start creating awesome content for your new blog
Now that your blog in up and running, it’s time to create some awesome blog posts. Go to the left menu, and click on Posts > Add New.

Enter the article name in the top box, and start writing your first article in the lower box. If you want to add media in your article, click on the Add Media button > Select Files > Insert into Post to upload the wanted picture.
Once you finished writing your article, simply click the Publish button on the right side of the screen, and that is it.
_
Thank you for your attention. We hope we were able to help you start your own WP blog. If you have any questions regarding this article, or you need any additional help, please do not hesitate to contact us below in comments, and we will do our best to help you in any way we can.
No Comments