


23 Sep How to Build A Fully Customized WordPress Login Page
WordPress login page is the first page most webmasters, writers or other staff associated with any site sees. After some time, it becomes boring, and we mostly ignore the login page subconsciously. To spice up the mood, webmasters can choose to spice up the login page with some custom look. This will bring better start mood and if you have a WordPress subscription where users can login into the site backend, the custom login page can be used as a brand value and also enable the user to associate him/herself with the web site philosophy.
The custom login page can be created in many ways, but I will go through the a simplified way of editing the functions.php file. It is ideal to create a plugin and then customize the login page, but going the plugin way can be time-consuming and at the same time daunting. To make sure that our tutorial works for wide range of audience, we will go forward and modify the functions.php file.
So, why the wait? Let’s get started.
Table of Contents
How to Build A Fully Customized WordPress Login Page
Adding a custom background
Our first step is to add a custom background to the login page. To do so, you need go to your WordPress theme folder and add a new CSS file, custom-style-login.css
After it is created, we need to tell WordPress how we can use it.
To do so, we need to go to functions.php file and add the following code to the file.
function custom_login() {
echo '<link rel="stylesheet" type="text/css" href="' . get_bloginfo('stylesheet_directory') . '/custom-style-login.css" />';
}
add_action('login_head', 'custom_login');
Let’s explain the above code.
We created a function called “custom_login” and then return the custom CSS URL.
Now, it is time to add a new custom background. It is always a good idea to add a custom background. To do so, choose any full-screen background. It can be anything. I would always go for a background that sticks well with the philosophy of the website. After making the choice, it is now time to modify the custom-style-login.css in the theme folder.
body.login {
  background-image: url('selected-image.jpg');
  background-repeat: no-repeat;
  background-attachment: fixed;
  background-position: center;
}
You can choose the file name as you want, but it is necessary to change the background-image URL in the 2nd line of the above code snippet.
Changing the WordPress Logo
WordPress Logo is great, and it offers quite an appeal, but we surely don’t want to put it on our custom login page. The logo can be changed with a single CSS line to the custom-style-login.css file.
Add the following code to the CSS file.
.login h1 a {
  background-image: url('logo-custom-login.png');
}
Don’t forget to change the login name in the 2nd line of the code. Save the file and let’s move to more advanced custom logins.
Modifying the form To Do Some Stuff
Forms are the integral part of any website, and when it comes to taking input, it is the bare minimum for anyone.
Now, we will modify their looks and how they work. Changing font size and color is the easiest way to get started with form customization. There are tons of possibilities here, so I will keep it to a bare minimum. You can go forward and add more customization if needed.
.login label {
  font-size: 30px;
  color: #7575a5;
}

.login input[type="text"]{
  background-color: HEXCOLOR;
  border-color: HEXCOLOR;
  -webkit-border-radius: 8px;
}

.login input[type="password"]{
  background-color: HEXCOLOR;
  border-color:#HEXCOLOR;
  -webkit-border-radius: 8px;
}
Change the HEXCOLOR to whatever color you choose. It is always a good idea to take a lighter background color and a good matching color as a border.
Next, you can change the button styling. You can go to Grains of Sand and test out different demos. All you need is add new properties to the
- .login .button-primary
- .login .button-primary:hover
- .login .button-primary:active
The three button classes are more than enough to make the changes. You can also search other pages for more customization code and then use it in CSS file. If you are a CSS veteran, you know how to write code for yourself. Experimentation is the key here. It doesn’t matter if you are a beginner or an expert.
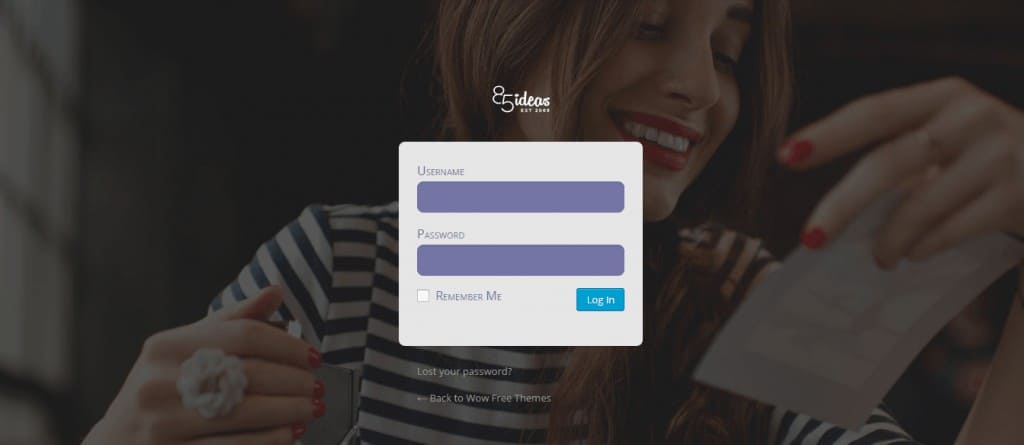
The result so far:
Changing some default options
The login page is created by WordPress, and it is obvious that you need to get rid of some of the URL that are embedded within the login page. For example, the logo, by default links to WordPress.org. It is not a good idea to leave it there, so we will change the login logo URL.
function logo_login_URL_removal() {
return get_bloginfo( 'url' );
}
add_filter( 'login_headerurl', 'logo_login_URL_removal' );

function login_custom_title() {
return 'SITE NAME';
}
add_filter( 'login_headertitle', 'login_custom_title' );
Securing the website
We have covered How To Find Your WordPress Login URL and A small guide on How to Protect Your WordPress Login against hackers. These two articles are helpful, and I would recommend you to go through them.
The Login page is one of the most favorite places for hackers and bots. It is the only way to get through the website. We will now make some changes so that it becomes harder for hackers to get hold of your website.
To further enhance the security of your custom login page, consider integrating WP Captcha to effectively block automated bots and prevent unauthorized access.
Removing the Lost Password Link
Lost Password Link is useful, but it can also be used by hackers only and only if your email is hacked. It is a general practice for removing the lost password link, but if you are not sure of the changes and how to cope with them in the future, I would recommend skipping this step.
For those who are confident of what we are going to do can follow along. Add the following line of code to CSS file to remove the lost password link.
p#nav {
  display: none;
}
Hiding the Login Error Message
Error login messages can be useful, but they are potentially a threat if misused by hackers. The hackers can try out a different combination and can know if they are wrong in the password or the username. By default, WordPress don’t show which information is wrong(username or password), but you may want to be extra sure by adding the following code to the functions.php file.
function login_error_jumbledup()
{
    return 'Incorrect login details.';
}
add_filter('login_errors', 'login_error_jumbledup');
I think, we have gone through some of the basic login page customization. There are still tons of customization you can do, and it would take a book to include all the options.
Want to do some customization not listed here? Comment below and I will surely help you! To add both creativity and security to your login forms, consider incorporating WP Captcha to prevent automated attacks and ensure a smooth user experience.”
Also, share the article with your friends!
No Comments